Sunday, February 21, 2010

Get your face on! I did.


Beth at The Stories of A to Z has challenged bloggers to be brave and show a before and an after make-up picture along with beauty products used.

Before (Eeek!)
This is me upon waking this morning, complete with velcro rollers of which I slept in.  
 
Notice my husband in the background wondering why I'm taking a picture of myself in these rollers. hee hee 
After Hair/Make-up 

Before I go on with posting the products I'm currently using, I want to give a shout-out to my favorite foundation: Estee Lauder Double Wear Foundation. If you need a full coverage, long lasting foundation...then this is for you! I'm not wearing this foundation anymore. Why? Because I'm out and I'm too cheap to spend $25 on more. This bottle was  actually given to me (Thank you, Gena. It lasted me nearly a year). 
 

I'm not big on specific product brands. I usually just buy what is on sale. I have to work hard at remembering to remove my make-up at night (bad, bad girl) and I could always improve on taking the time to put on some sunscreen (and I've got wrinkles to prove it). 
 

So, here's what I'm using today
(because tomorrow could be different):
Velcro Rollers: I prefer to wash my hair at night, let it dry, then don my rollers (hair slightly misted)
Frizz-Ease Straight Fixation: I just bought this and I like it so far. Helps keep my hair straight and not poofy.
Mary Kay Time Wise 3 in 1 cleanser and moisturizer for dry skin. 
Covergirl Creme Foundation CG Smoothers: I just bought this and I like it okay so far. It helps keep my dry skin moisturized. 
Maybelline Mineral Powder: I love this product which I use on top of my foundation.
Eyeshadow: Almay for Hazel eyes
Eyeliner: black Revlon ColorStay for top lid only
Avon Brow pencil
L'Oreal Carbon Black Voluminous Mascara
Lipstick: I use many brands but today I'm wearing Revlon Super Lustrous in Copperglow Berry (great moisture for the lips)
Oh, and I just dyed my hair last night (the second time in one week...Yikes!). I have naturally dark hair but I like to give it a little boost. Sometimes two boosts in one week. Ha! I used L'Oreal Hair Dye from Sally's beauty supply in Caramel along with a Volume 10 developer (which I'm told is for a deposit only, with little to no lifting power and is not harsh on your hair like the higher volume developers). I'm not a hair dresser but it sounds good to me. 

Go ahead! Get your face on, too! And don't forget to post a link here: The Stories of A to Z
and check out all the other before/afters.


Welcome Baby Dane

We hosted a little shower for Baby Dane today. He was not due until mid-March but he came early and then had to spend about a week in the hospital. He was released from the hospital today, which was earlier than expected. His unexpected release today coincided with the time of the shower so mom and dad were not able to join us. We still had a great time visiting with guests, eating cupcakes, chicken salad, crackers, and sipping on strawberry punch.

Looked like Baby Dane made off with lots of goodies. We loaded down a big SUV with the loot to be delivered to the proud parents.

P.S. From the picture I saw, Dane's definitely a cutie! Lots of dark hair styled into a little faux-hawk!

Wednesday, February 10, 2010

An old but new house

We just had the 3rd anniversary of being in our house and lately my wheels have been spinning on what my future home will look like. In my mind's eye, I'm picturing something old but new---something that looks 100 years old, but that is newly built. Nothing elaborate (we're both teachers here, people)....around 2000 square feet, hardwood floors, simple painted cabinets, white moulding, yum! I'm starting to really take a liking to cottage style homes. Here's a couple of exteriors that make my heart sing. English cottage? Tudor style? I'm not sure...but I'm in love!

If you are in the market for a new home, these houses are for sale in the University Park/Highland Park area of Dallas. $500,000 plus. I'm sure they would take a check.

Beautiful interior....this kitchen is not part of either house above, but stunning nonetheless. Sorry, I neglected to save the link to this picture...I'll gladly give credit if anyone knows its original location. I'm guessing this is just half of the kitchen (I'm such a good guesser) since the main sink is MIA as is the fridge, etc. Wish I could see the other half before I clean up this drool.

CMT Cribs--Paula Deen, Jamie O'Neal & Jason Aldean

It's fascinating to take a peek inside houses and see how people live. I think of these 3 celebrity homes, Paula Deen's house is definitely a favorite. Jamie O'Neal's house has a rustic-old-world look to it, but I wonder how soon one would get tired of all the faux finishes? Love the green kitchen of Jason Aldean's house (he's not so hard on the eyes himself!). I wish I were brave enough to do something so bold with color.

**You may want to disable my playlist at the bottom by hitting the stop/pause button before watching this clip, especially if you suffer with Attention Deficit Disorder.** Just sayin'.

Thursday, February 4, 2010

Love this bacon!

Not sure why I'm blogging about bacon, but for a southern girl who doesn't like much meat....she gets kind of proud when she finds something in the meat department that she does like. I'm an extra-crispy bacon kind of girl. No floppy, chewy bacon for me. What I love the most about this bacon is that it is microwaveable in its own little bag that catches all the grease...so no mess. (I refuse to cook with grease b/c I hate the little splatters that go everywhere). A bit on the pricey side (around $5 for 16 pieces), but the convenience and taste are well worth it.

We (he) won!

My husband won a laptop in a drawing at his school!!! Not crazy about changing to Windows 7 (still getting used to Vista), but hey...it was F R E E! Can't wait to blog from the recliner...the sofa...the bed, etc. He said he can't believe he won and that he is NEVER that lucky. Wrong. He once won $800 cash at my company Christmas Party. He didn't even share with me. (Just wrong for that). He took it straight to the bank. {Penny pincher!}

Tuesday, February 2, 2010

Craig's List Bed

Here's the bed that I have claimed off of Craig's List. Supposed to be making the 45 min drive to a little country town to pick it up on Saturday. I plan on painting it black! Will look suh-weet with my new Ballard Designs pillow covers (see previous post). ;)

New Pillow Covers ~ Ballard Designs

S U P E R excited about the sale on pillow covers over at Ballard Designs. Thank you Maria for sending this my way. $4.99 each. Yep. Plus F R E E  monogramming. What a steal! I ordered two 18" pillow covers in white duck cloth with our initials in black, plus one 12x20" pillow cover in the same white with our full last name in black stitching. Three pillow covers, with monogramming, and shipping for only $20! Score.

I believe all they have left are the White and Cream Colored duckcloth. My instinct was to go with Cream but I'm stepping out of the box and going with White (yes, white is stepping out of the box for me in terms of home decor. I own nothing white in that arena).  I'm trying to let go of the dark and move over to some brightness!

Sunday, January 31, 2010

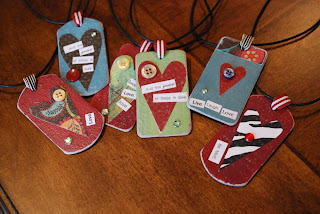
Valentine Necklaces


Valentine pendants I made for a fundraiser at school. Chipboard, paint, scrap paper, mod podge, sanding block, ribbon, buttons, E6000 glue, and a little bling. The green one above is my favorite, I think.


Monday, January 18, 2010

A New Project: Refinishing Furniture

I'm working on refinishing a small wooden piece that goes in our bedroom. The AFTER pics are coming soon. Here's the BEFORE (minus the drawers).


A little sand paper and a lot of elbow grease. I'm showing off my dust mask. (Hot, I know. I don't think I had even brushed my hair at this point in the day and yesterday's mascara is running down my face).


After sanding and vacuuming all the dust; I added some primer. I'm really impressed with this primer.


And then it must dry overnight. Or at least I'm making it dry overnight b/c I'm too tired to add the final touches. I originally bought some linen colored paint to finish it off but now I'm leaning towards black. What do you think?

Decorating with Numbers

I'm loving the look of decorating with numbers. I used my vinyl machine to cut numbers to embellish the front of an Antique dresser in my foyer.


Feel free to use these numbers here for your own project (just click to enlarge, then right click, save as):


I also added some vinyl art to my front door (inside and out). I'm probably overdoing it with the vinyl. But I'm having fun in the meantime. :)


Saturday, January 16, 2010

Simple and Sweet Baby Shower Ideas

I hosted a baby shower for my cousin and his wife today. It was simple and sweet. Little Maleigha made off with lots of goodies.

We served three flavors of cupcakes that we made ourselves (vanilla, chocolate, and strawberry). Topped them with some sugary sparkles and a personalized cupcake topper. Stacked them on tiered servers.


Served this slushy punch. Nice and tart, if you like tart. Ingredients: Country time lemonade, pineapple juice, water, Sprite

Made these crackers to off set the sugar. A little spicy (ok, a lot spicy for some of us). Ingredients: Whole grain saltine crackers, vegetable oil, ranch dressing powder mix, garlic powder, crushed red peppers. You cover the crackers with the mixture, shake them up until evenly coated, and toss in the oven for a few minutes. There are lots of different takes on this recipe that you can find online. Just search for saltine cracker recipes. There is even a taco flavored recipe.

We decorated with floral fabric for the table runner and girly doll clothes to hang with clothespins. Bright and colorful, a step away from the traditional pastels. 

Cupcake Toppers - Make your own

 
To dress up your cupcakes, make your own cupcake toppers.
1.trim scrapbook paper (I used double sided thick scrapbook paper) to 8.5 x 11 or to fit your printer
2. design the topper in microsoft word or photoshop elements (I sized them 1.5 x 1.5 inches each)
3. copy and paste the designed topper to fill the page
4. print and cut
5. glue the toppers on a toothpick using a small dot of white elmer's glue

Thursday, January 7, 2010

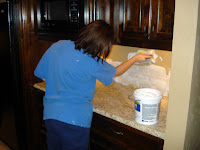
Antique Brick Backsplash - Before and After

Before:


This is an old project, but I thought I would go ahead and post the How-to, in case anyone is interested.

We wanted our backsplash in our kitchen to be be unique and have an old-world look to it.

We purchased antique brick called "Texas Antique" from Metro Brick and Stone. We had a masonry worker slice off the face of the brick (about one half inch thick). Antique brick is reclaimed from old buildings and streets.

We used a trowel to apply ceramic tile adhesive to the wall and using very precise, highly sophisticated tools we spaced out the bricks. Those "highly sophisticated" tools we used for spacers are called markers and pencils. We just jabbed them in the gaps. Then, we ran out of those and found a bucket of wire nuts that worked just fine. You don't want it to look perfectly even, even if you are married to a Type A perfectionist like someone else I know. 


After it dried, we grouted the brick using tile grout in a color that matched the mortar on the outside of our house. We like the old-world messy mortar look so we smeared it a bit. Then we sealed it all with a stone/tile sealer for protection. 

After:

Cost: It ended up costing about $10 a square foot b/c of having to purchase the brick and then hiring someone with a masonry saw to do the cuts for us. We have a cozy kitchen, so we didn't have that much wall to cover; it was not that pricey of a project for our space. Tile (ceramic or natural stone) would have been more economical. All-in-all, we are pleased with the look and feel of the old brick.

Posted on The Thrifty Chick's Before-and-After: 


Saturday, January 2, 2010

Trash to Treasure? I have a vision for these dirty ugly chairs.

I'm going to make a home for these grungy chairs that I found at the junk store today. The best part? $10 each. Yep. My husband was with me when I spotted these. He was waiting in the car and didn't know I was going to actually buy them. I gave the man a check incognito and had my brother go pick them up later and take them to my parent's house. Sometimes a girl has to be sneaky like that (especially when she has a vision).

So, here's my vision: give them a bath, paint them black, sand and distress, and cover the cushions in burlap or painter's drop cloth (thanks to shanty2chic for that idea). :) I'll post a before and after someday.

I can just see them now...all frenchy and cute in a little sitting area with a table in between. 

Go ahead. Click on the picture to enlarge to see just how dirty they really are. I swear these were out in the barn with the cows. Do cows stay in a barn?

Wall Art: Redo w. Burlap


Since the new colors of my bedroom makeover do not include red, the red pictures had to go! Here's the before:


Here's what I did:
I took the pictures apart removing the backing the print and the mat.


Spray painted the frame a matte black.
Covered the picture mat in burlap using a hot glue gun.


Designed a small print for the center of the frame using Photoshop Elements; printed at Kinko's on laser paper.


Put it all back together (carefully).

Love the new look and glad I didn't go spend more money on new wall art. What do you think?

I added this before-and-after to the Thrifty Decor Chick's site. Check it out for more re-do's.